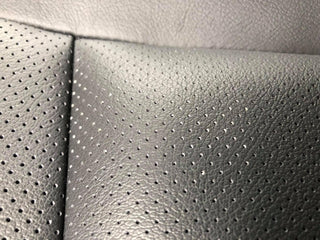
Perforated leather seats are a very nice touch to an interior, they offer better comfort and cooler seating, which is why they are used and were designed as the perforations allowed for better air movement and wicking of moisture. But they can become clogged up when spills happen, or sand gets inside the vehicle.
Begin the cleaning process by giving your seats a good vacuuming. Use a soft brush attachment to get into the perforations and remove loose dirt and sand particles. This initial step helps prevent further scratching during the cleaning process.
Just going in with a leather cleaner and brush can cause more harm than good, we have to look at the SBTG© effect the “Science Beyond The Grain”© Leather has a microscopic coating called a clear coat layer, this clear coat layer is ultra-thin and great care has to be taken, many people will tell you, you don’t need to apply a protection cream to leather as you can’t feed it, that is a complete myth and false, as people don’t understand leather like we do, we have been involved with leather for over 39 years. That’s why our slogan is We Know Leather©
This picture should help you understand just how fragile the leather surface is. But after 3 years that surface coating has already been worn away so the surface becomes even more fragile, its at that point you need to take even better care of your leather.

Preparing The Interior
Once you have given the surface a good vacuum with a soft brush attachment to help lift away any dirt, dust and sand on the leather, we can begin another step, you can use a soft-bristle brush or an old soft toothbrush, gently brush the perforations to loosen stubborn dirt and sand. Be patient and meticulous, paying extra attention to areas where dirt might be deeply embedded.
The next step to help get dust and dirt out is compressed air, using a soft rubber tipped air attachment, gently move over the surface with the air pressure turned up high, so that the dirt and grime can be blasted out of the perforations in the leather.
The Cleaning process
Once you are satisfied all these have been removed you can then move to the cleaning stages. Using a dedicated leather cleaner, LRC1 Leather Cleaner is the most common cleaner used in auto interiors. The best approach is due to the perforations is spray the cleaner on to a bamboo cleaning pad and then begin your cleaning process by rubbing the bamboo pad over the surface. As you proceed wipe away any excess with a bamboo fibre cloth. If the perforated leather still has some dirt and dust in the perforation holes then, you can spray LRC1 leather cleaner into a brucle leather cleaning brush and gently wipe this over the surface to help soft the dirt and dust in the perforations.
Once this stage has been carried out, you can then vacuum the interior again paying attention to the areas where dirt and grime is stuck in the perforations. This should lift the remaining dirt out of the perforations as the cleaning stages will have helped to soften the dirt that’s dried into the tiny holes on the leather seats.
Applying The Protection
The final stages is feeding and or protecting your leather, this can be done with many different products depending on the age of the leather, if its under three years old then you require leather juice, this was developed for cars up to 3 years old. The leather protection cream was developed for leather of any age, but its perfectly suited for leather that’s over 3 years old as the leather then becomes even more absorbent than leather under 3 years old. Leather protection spray offers a great costing like a ceramic, never use ceramics on leather as accelerate the drying out of leather and cracking on the surface. The leather protection spray offers great production and waterproof properties. LRC41 Leather Guard is the equivalent of a ceramic coating without causing any drying out issues of the surface coating, it’s a fully breathable product that becomes an integral part of the hide itself by synergistically bonding to the surface.


